Softball Drawing Easy: A Step-by-Step Guide for Beginners
Learning how to create a softball drawing easy enough for beginners can be a rewarding experience. Whether you’re an aspiring artist, a softball enthusiast, or simply looking for a fun drawing project, this guide will walk you through the process. We’ll break down the steps, offering tips and tricks to make your softball drawing look realistic and appealing. This tutorial focuses on making the process accessible and enjoyable, ensuring that even those with little to no drawing experience can achieve satisfying results. With a few simple steps, you’ll be able to create a softball drawing easy enough to be proud of.
Materials You’ll Need
Before we begin, gather the necessary materials. You won’t need much, making this a convenient and accessible project:
- Paper (sketchbook or drawing paper)
- Pencil (HB or 2B recommended)
- Eraser
- Optional: Ruler or compass for perfect circles
- Optional: Colored pencils or markers for adding color
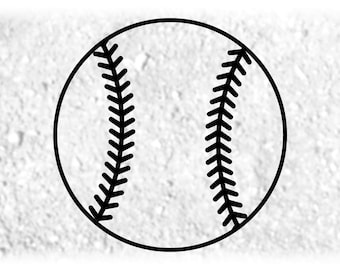
Step 1: Drawing the Basic Circle
Every softball drawing starts with a circle. This will form the basic shape of the ball. Use a pencil and lightly sketch a circle on your paper. Don’t press too hard, as you may need to erase parts of it later. If you have a compass, you can use it to create a perfect circle. Alternatively, you can trace around a circular object like a cup or a roll of tape.
Step 2: Adding the Seam Lines
The most distinctive feature of a softball drawing is its unique seam pattern. These lines are what make a softball instantly recognizable. Here’s how to draw them:
Drawing the First Curve
Start by drawing a curved line that extends from the top of the circle to the bottom. This line should resemble a shallow ‘S’ shape. It doesn’t have to be perfect; slight imperfections will add character to your softball drawing.
Drawing the Second Curve
Next, draw another curved line mirroring the first, but on the opposite side of the circle. This second line should also extend from the top to the bottom, creating a symmetrical seam pattern. Ensure that the curves are relatively even to maintain a balanced look.
Adjusting the Seam Thickness
Now, thicken the seam lines. You can do this by drawing a parallel line on either side of the original curve. This gives the seams a more pronounced and realistic appearance. Remember to keep the thickness consistent throughout the softball drawing.
Step 3: Adding Details and Shading
To make your softball drawing more realistic, add some details and shading. This will give the ball depth and dimension.
Adding Stitch Details
Along the seam lines, add small, dashed lines to represent the stitches. These stitches should be evenly spaced and follow the curve of the seams. This small detail can significantly enhance the realism of your softball drawing.
Shading the Softball
Decide where your light source is coming from. On the opposite side of the light source, add shading to create a sense of depth. Use light, gentle strokes with your pencil to build up the shading gradually. You can also add a subtle shadow beneath the softball drawing to ground it on the page.
Step 4: Refining and Erasing
Once you’ve added the details and shading, take a step back and assess your softball drawing. Look for any areas that need refinement or correction. Use your eraser to clean up any stray lines or smudges. This is also a good time to darken the outline of the softball if desired.
Step 5: Adding Color (Optional)
If you want to add color to your softball drawing, now is the time. Softballs are typically yellow, but you can use any color you like. Use colored pencils or markers to fill in the softball, being careful to stay within the lines. You can also add highlights and shadows to enhance the three-dimensional effect.
Tips for a Better Softball Drawing
- Practice Regularly: The more you practice, the better you’ll become at drawing. Try drawing softballs from different angles and perspectives.
- Use References: Look at real softballs or photos of softballs to get a better understanding of their shape and details.
- Don’t Be Afraid to Erase: Drawing is a process of trial and error. Don’t be afraid to erase and start over if you’re not happy with your results.
- Experiment with Different Techniques: Try using different shading techniques or drawing with different materials to find what works best for you.
- Have Fun: Drawing should be an enjoyable activity. Relax and have fun with the process.
Common Mistakes to Avoid
- Uneven Seam Lines: Make sure the seam lines are symmetrical and evenly spaced.
- Inconsistent Shading: Pay attention to the direction of your light source and shade accordingly.
- Overly Dark Lines: Use light, gentle strokes when drawing the initial circle and seam lines.
- Ignoring Details: Don’t forget to add the small details, such as the stitches and subtle shading.
Why Drawing is Beneficial
Beyond creating a softball drawing easy enough for anyone, the act of drawing itself offers numerous benefits. It can improve your hand-eye coordination, enhance your creativity, and provide a relaxing and meditative outlet. Drawing also sharpens your observation skills, helping you to notice details in the world around you that you might otherwise miss. Whether you’re drawing softballs, landscapes, or portraits, the skills you develop through drawing can enrich your life in many ways.
Softball: More Than Just a Game
Softball is a beloved sport played by millions around the world. It’s a game of skill, strategy, and teamwork. Drawing a softball drawing can be a way to connect with the sport on a deeper level. It allows you to appreciate the details of the game and express your passion for softball in a creative way. [See also: The History of Softball] Furthermore, creating a softball drawing easy enough for children can be a fantastic way to introduce them to both art and sports, fostering creativity and physical activity simultaneously. A simple softball drawing can also serve as a personalized gift for a softball player or coach, demonstrating thoughtfulness and appreciation for their dedication to the sport.
Conclusion
Creating a softball drawing easy enough for beginners is a simple and rewarding project. By following these step-by-step instructions and tips, you can create a realistic and appealing drawing of a softball. Remember to practice regularly, use references, and don’t be afraid to experiment. Most importantly, have fun with the process! Whether you’re a seasoned artist or a complete beginner, this guide will help you create a softball drawing that you can be proud of. So grab your pencil and paper, and start drawing your own softball drawing easy enough to share with friends and family. You’ll be amazed at what you can create with a little practice and patience. This guide aims to make the process of creating a softball drawing easy and accessible to everyone, regardless of their artistic background. Keep practicing, and you’ll be creating stunning softball drawing in no time. The key is to break down the process into manageable steps and to focus on the details that make a softball drawing recognizable and appealing. Happy drawing!
